IS428 AY2019-20T1 Assign Nurul Khairina Binte Abdul Kadir Data
VAST 2019 MC1: Crowdsourcing for Situational Awareness
|
|
|
|
|
|
Dataset Analysis & Transformation Process
The following section illustrates the issues faced in the data analysis phase leading to a need to transform the data into a specified format. Tableau Prep will be used to clean and prepare the data for analysis. The CSV file is converted to Excel in order to import it into Tableau Prep.
Data Transformation of MC1-Report-Data
There are 3 main issues with the given dataset and data transformation is needed to reshape the data for easier analysis.
1. Inability to filter by damage type
2. Neighbourhood coordinates
3. Relationship between shake intensity and other damage types
Pivot the Damage Types
| Issue | Inability to filter by damage type |
| Solution | Pivot the following columns - Shake Intensity, Sewer and Water, Power, Roads and Bridges, Medical and Buildings. Pivoting the data will create more rows for each time and location. This will provide users with the ability to filter the data based on the damage type which is needed for further analysis. |
| Steps Taken |
1. Connect to the data source |
| Screenshot |
|
Neighbourhood Coordinates
This is a continuation of the previous step.
| Issue | The data zip file from Mini-Challenge 2 includes a blank PNG image of St. Himark. However, there are no coordinate points (latitude and longitude) to identify each neighbourhood in the dataset and the background image will not load since the X and Y coordinates are missing. A map will provide the emergency responders with a better idea of the extent of the damage in the various neighbourhoods in real-time. |
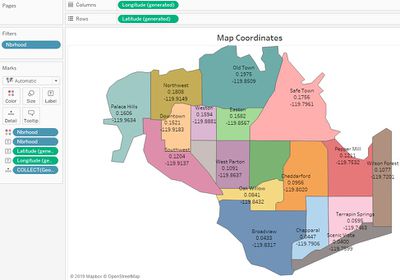
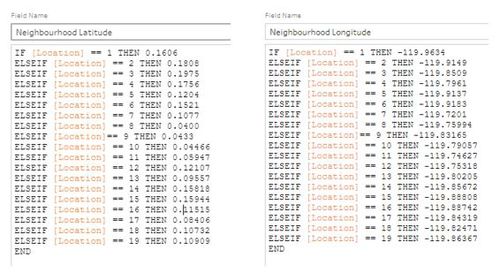
| Solution | One of the ways to get the coordinates of each neighbourhood is by using the shapefile. Once the shapefile is imported into Tableau and a map is created in a worksheet, the latitude and longitude will be generated automatically. Display the coordinates of the map and use this as a reference. In Tableau Prep, create 2 calculated fields for Neighbourhood Latitude and Neighbood Longitude for each neighbourhood. |
| Steps Taken |
PART A: Working with Shapefiles 1. Go to Connections. Add a Spatial file. Select the StHimark.shp file. The coordinates of each neighborhood will be displayed on the map as follows:
1. Use the same flow from the previous step in 1.1.1. Add a Clean step in the flow The calculated field formula will be as follows: |
| Screenshot |
|
Addition of Columns In Transformed Dataset
The following columns are added into the transformed dataset in 1.1.2 using Tableau Prep. This can be done at the Clean Step in the flow. With reference from the background information document, calculated fields are created for the following fields:
| Field | Description |
|---|---|
| Amenities | There are 4 possibilities. A neighborhood can have a school, hospital, hospital, and school or no amenities. |
| 1st Hospital Name | The name of the hospital in the neighbourhood / nearest hospital |
| Specialization | The specialization of each hospital |
This is a sample of the final dataset known as MC1-Main which will be loaded into Tableau.
Relationship Between Shake Intensity and Other Damage Types
| Issue | It is difficult to see the relationship between shake intensity and other types in the given dataset and the transformed dataset above. It is important to analyse this relationship since anomalies in the data can be detected. For example, if a city is greatly affected by the earthquake based on the shakemap and have a high shake intensity impact score, it will be unusual if the buildings/medical/power etc. is unsually low. Further investigation will be needed. |
| Solution | Using the given dataset, pivot the following columns: Buildings, Medical, Power, Roads and Bridges and Sewer and Water. Shake intensity should not be included here. Export the data. A new data source have to be created in Tableau. |
| Steps Taken |
1. Use the same flow file from the previous step. Add a Pivot step. Drag the columns mentioned above into Pivot values. This dataset will be known as MC1-Relationship and will be loaded into Tableau. The final flow in Tableau Prep will be as follows: |
| Screenshot |
|
New Spreadsheet on Maintainance Information
This will be the 3rd and final dataset that will be loaded into Tableau. It is known as the MC1-Maintainance Description dataset.
For some neighbourhoods, there are some maintainance projects going on that will result in traffic delays/power outages etc. Therefore, this information have to be considered in our analysis and it can be used in evaluating the reliability of the reports.
The Maintainance Description dataset is created in Excel and the values were added manually based on the information provided in the About Our City document.
The dataset is as follows:
Dataset Import Structure & Process
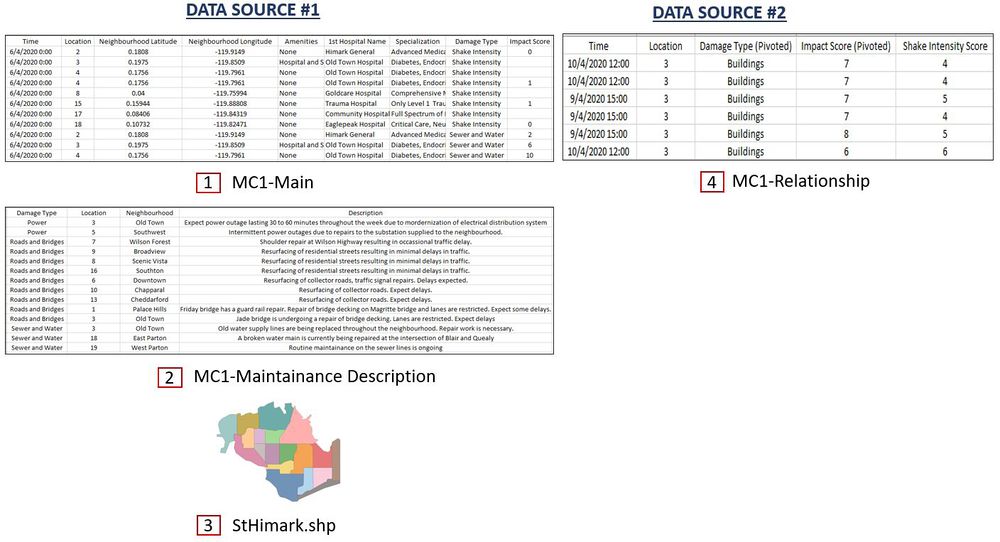
With the dataset analysis and transformation phase completed, the following files will have to be imported into Tableau for analysis. There will be 2 data sources.
Overview of Data Sources
Data Source 1
Add a connection in Tableau for the following files:
1. MC1-Main.csv - Damage types are pivoted. Neighbourhood coordinates and additional information (amenities, hospital info) are added. Formatted from Data Transformation, as mentioned in 1.1.1, 1.1.2 and 1.1.3
2. MC1-Maintainance-Description.csv - Spreadsheet is created manually in Excel
3. StHimark.Shp - Shapefile is obtained from MC2 Data file
Data Source 2
4. MC1-Relationship.csv - Relationship between shake intensity and other damage types Formatted from Data Transformation, as described in 1.1.4
Diagram
Data Connection
Data Source 1
After the files have been added as a connection in Tableau, do the following steps:
1. Import MC1-Main.csv as a data source.
2. Drag MC1-Maintainance-Description.csv from the left panel to the top right panel.
3. Perform a left join between MC1-Main.csv and MC1-Maintainance-Description.csv to link the maintainance descriptions to the respective neighbourhoods. The join conditions will be the Damage Type and Location.
Next, the shapefile will be added into the data source.
5. Drag StHimark.Shp from the left panel to the top right panel.
6. Perform a inner join between MC1-Main.csv and StHimark.Shp in order to create the map. The join conditions will be the MC1-Main.csv Location field and the StHimark.Shp Id field.
The final data source will be as follows:
Data Source 2
As for Data Source 2, it is very straightforward. Drag the MC1-Relationship.csv file from the left panel to the top right panel.
The data transformation process is now complete! Before we go into the data analysis, we will do information gathering to have a better idea of what to expect.


