IS428 2016-17 Term1 Assign3 Bong Jun Hao
Contents
Data Exploration/Cleanup
Employees.xlsx
By itself, the dataset provided was not enough to provide any insights, except for to identify the department and floor/zone of a particular employee. Issue: It is mentioned that an employee could possible hold multiple proxID as they would pick up additional prox card(s) if they have misplaced their old one. This is not reflected in the employees file provided.
Solution: Upon further investigation of the proxOut file, it can be seen that the proxID of an employee is based on the combination of the first character of an employee's First Name followed by his or her entire Last Name as well as a 3 number digit code that is in running order from 001 onwards.
An example would be Anda Ribera, where Anda is the first name and Ribera is the last name. Hence he would have the id Aribera001 and any subsequent id issued would be aribera002, aribera003 so on and so forth. As such, an additional column is added to the employees.xlsx file based on the proxOut file to see what are the various ids that each employee holds.
The employeeId id derived using the formula, "=LOWER(CONCATENATE(LEFT(D3,1),C3))". This is used to identify with the employee and would be used as a join id with the combined proximity data later on in Tableau.
Mobile and Fixed Proximity Data
Issue: The problem with the mobile and fixed proximity data is that ProxOut (Fixed) shows the floor and zone of each area whereas for the mobile ProxOut, it shows the X and Y coordinates in replacement of the zone. Hence without a common set of values as well as mappings, it is not possible to connect the fixed and mobile proximity sensor on the map to give us an indication of the location of the employee.
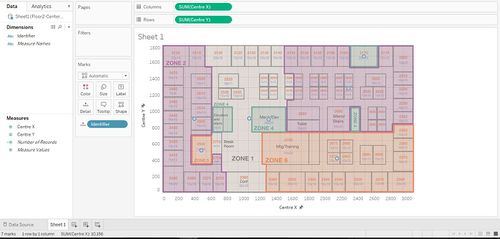
Solution: The solution is to find a way to be able to map out the areas on the proximity zones images provided and give a X and Y coordinate mapping which can be then added to the mobile Proxout data file. I referred to Gwendoline's work where she used this online tool, from Bryant Howell to draw out custom polygons on the map provided and to get the centre point X and Y coordinates of these zones.
The online tools is available at this link: https://github.com/bryantbhowell/tableau-map-pack
Following Gwendoline's idea, i cropped out the map images provided so as to remove white spaces and to show only the map area only as well. Other points to note when plotting the polygons are:
1) For zones that encompasses a large area of the map such as Zone 1 of Floor 1 which refers to all the corridors and white spaces in that area, I only plotted the polygon of the corridor.
2) For zones that includes multiple areas such as Zone 4 of Floor 1, only one area is drawn, as it refers to all the staircases and stairwells and it makes sense to just map the X and Y coordinate to one staircase as it is assumed that it is not important to track the exact staircase location for each employee who are at it.
With the polygon mappings of the cropped image, i then proceeded to calculate the center point of the coordinate using Excel. What i did was to use the formula: "=MEDIAN(MIN(C$2:C$5),MAX(C$2:C$5))" to find the exact center X and Y value for each polygon.
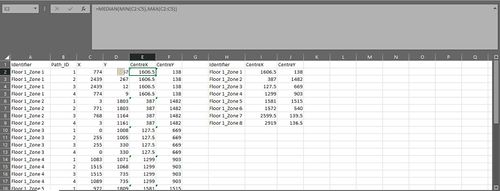
This was repeated for floor 2 and 3. However, due to floor 2 and 3 having irregular shapes, some of the mid points were off and had to be manually changed.
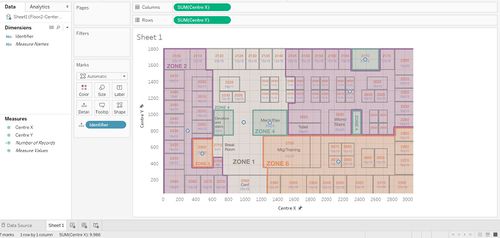
The mid point mappings for each floor and zone is then combined as seen.
With this mapping we then proceed to combine the Proximity Data together. As the mobile proximity data already has the x and y coordinates mapped, only the fixed proximity sensor will be mapped, using a V-lookup function. Prior to that function, a column called identifier which combines the floor and zone is created so that the correct x and y coordinates can be determined from the mapping table. This is then combined with the mobile proxOut data.
NOTE:
I realized i made a mistake when initially counting the midpoints as i've sent the range of X and Y to 3085 and 1019, without rescaling it to the required dimensions of 189 (X) and 111 (Y). I have since resized the map images and redone/readjust the plotting and calculation of the mid points accordingly.
Building Data
For the building data that was provided, i split it into various segments, namely: 1. The building with all its unique attributes alone. 2. By floor when it contains all the attributes of a building floor without attributes from zones. 3. Lastly, all the elements which contains both floor and zone attributes are grouped together.
After splitting the data up, the data were reshaped for easier processing in Tableau using the Tableau plug in.
Hazium Concentration
For the hazium dataset, it was processed similarly to that of the building data. It is slightly different in the sense that instead of splitting them up, i proceeded to join all the datasets together and perform a data reshaping after that.
Data Import
The data sets used are as follows:
1.BuildingCleaned - This is the cleaned up data file containing all attributes and data pertaining only to the building.
2.BuildingReshaped - This is the reshaped data file based on BuildingCleaned for easier processing in Tableau.
3.combinedProxData - This is the cleaned up combined proximity data which also contains the x and y coordinate mapping for the fixed proximity sensor.
4.EmployeeCleaned - This is the list of employees with the id added in so that they can be used in conjunection with the promixity data.
5.FloorCleanReshaped - This is the cleaned up and reshaped data file containing all attributes and data pertaining only to the floor of the building.
6.FloorZoneCleanedReshaped - This is the cleaned up and reshaped data file containing all attributes and data pertaining only to the floor by zones of the building.
7.HaziumCleanedReshaped - This is the cleaned up and reshaped data file containing the Hazium data. It has the combined data of all the hazium floor data.
I encountered a difficulty in which instead of importing each of the data set used as a new data source, i imported only 2 data sources, the first one being the file that combines the fixed and mobile proximity sensor data, and adding a new connection and doing a left join to the employee list so as to map the sensor data with the employees.
The second one was to use the building data as a primary data source and adding all the other data such as floor, floorzone and the hazium concentration excel as a data connection. This was a HUGE mistake as it resulted in me being unable to publish the workbook as in the end all the data had to first be extracted, and due to the data connection joining, it still could not be extracted after more than 15 hours as shown:
In the end the faster way of importing the data set would be to add each excel/csv file as a new data source in Tableau, and if a relationship needs to be established, then to go to "Edit Relationships" to link them if required. The combined promixity sensor data is left untouched as it is required to do a joining with the employee list in order to successfully track and plot their movement later.
Tableau
Link
The tableau workbook is published here: https://public.tableau.com/profile/publish/BongJunHaoAssignment3/Home#!/publish-confirm
Data Visualization
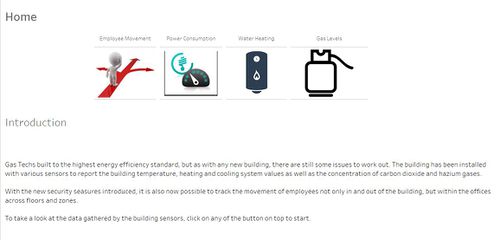
A simple home page with custom buttons to navigate through 4 different dashboards, namely, Employee movement, Power Consumption, Water Heating and Gas Concentration has been set up. For each dashboard page, the same custom buttons appear to bring the user back to home page or to the other pages.
While the dataset produce was very large and complex, I felt that for the common user, it would be good to keep it simple and clean so that they would not be overwhelmed by the dataset. Even though the cleaning up of the data and making sense of it part took up alot of time, it does not mean that i have to pass this complexity to the user as well.
As such, the dash board is split into 4 components, based on the employee movement, the power consumption of the building, the water heating as well as the gas concentration levels. These 4 components are chosen as I felt it was more important or relevant to a normal user.
Buttons
As making of custom buttons were not taught in class. I went to research and learn about how to make it via online resources. The idea to it was to basically:
1. Create an additional worksheet for each button, and for each worksheet to create a generated field using the name of the button as the name of the generated field, and then a string such as "Home Button" under comments.
2. Drag the field to the worksheet, and set it up as a shape under "Mark".
3. When setting up the shape it is possible to use custom images. I preselected certain images i wanted as the image file for the icon, and save it under a custom folder inside the "Shapes" folder of Tableau such that it can be accessed from within Tableau.
4.Once the shape has been selected, to make it function as a button, one has to set it as a filter.
5.To set up the button as a filter, i clicked on "Worksheet", then "Filters", where i added a filter, with the source as the home button worksheet, and the target being the home dashboard that i want the button to bring me to.
Employee Movement Dashboard
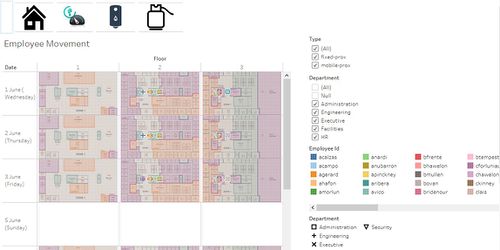
For the employee dashboard, besides the button to navigate through the pages, other interactivity technique use includes highlight on select. A user would be able to click on for example, a particular department from the legend and it will be highlighted in the diagram and vice versa.
A user is also able to filter by type whether he wants to see movement based on the fixed or mobile proximity sensor, as well as to filter by departments. These filtering is done by using the checkboxes provided.
As for the tracking of movement, it is done by using HOUR(Timestamp) as a page, which will give an option allowing the user to select a particular hour to view the movement of employees, as well as to click "play" to allow the user to see the movement as the day goes by, hour by hour.
Task 1
This is based on the proximity data for by combining both mobile and fixed promixity sensors data and linking it to the employeeId and proximityId to see if there is any patterns within departments or movement patterns.
The typical patterns in the proximity card data set is that: 1. From 12am - 6am, the only data collected by the fixed sensor is from the level 1 fixed proximity sensor, indicating that is it quite likely that no employees are moving around level 2 and 3 between this period of time. 2. Outside of the time frame between 7am-5pm, there is no movement of any staff from the security department.
A typical day of an employee of GASTech would be:
1. Employees reach the office from 7am onwards.
2. By 9am most employees are already in their office.
3. Lunch time is about 12 noon - 1 where we see quite a bit of people at the Deli after which there is movement around the offices.
4. Employees tend to end work/knock off at 5pm with a few exceptions who end work from 4pm onwards.
5. Employees from the IT and Engineering department tend to stay and work till much later than the others, going home at about 11-12 midnight.
Task 2
This is with regards to the building data, where i split it into data concerning only the building itself, data that involves the various floors of the building and lastly data in connection to each respective zone and floor of the building.
1. The water heater temperature set point is at a consistent level of 60 degrees, and water temperature entering the heater(inlet) tend to decrease after 5am and increase after 12 noon, with a consistent inlet mass flow rate.
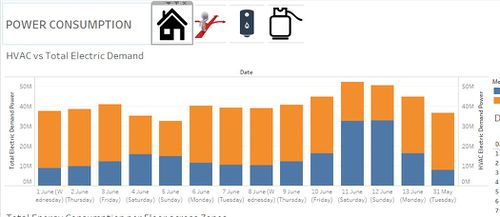
2. There was a noted peak in the total electric power demand on the weekend over June 10th - 13th. This is peculiar as there should be lesser demand for energy due to lesser staff being in the office instead of experiencing a sudden spike in demands.
3. The level of carbon dioxide concentration requires attention at level 1, at the zone 5 and 7 level. It is considered acceptable for the other levels.
4. The supply fan consume higher levels of power between 7am to 10pm, the outlet mass flow rate does not fluctuate as the day pass. This is in line with the new building being energy efficient by consuming higher levels of power when there is more people during the working hours.
5. It seems that the HVAC fan demand for power increases or is higher during the weekends rather than during the normal working week.
6. The deliFan consumes least power between 6-7am and 5-9pm. It also seems to consumer quite a bit of power on Sunday.
7. The bathroom exhaust fan is consistently consuming power one level 1 and 2 throughout the day. On level 3, the fan consumes power between 7am to 10pm, but this is peculiar as most employees should have left level 3 after 7pm.
Task 3
The notable anomalies/unusual events are as follows:
1.The fan supply uses high power at 4am, as well as over the weekend on floor 3. This is abnormal as no one or very little people would be working there over the weekend.
2.The hazium gas concentration was abnormally high for all levels of the building on 11 June from 1pm till late. Even though the effects are not known, this makes it a possible health issue for employees.
3.The carbon dioxide concentration level spiked dangerously high on the 5th and 6th of Jun, reaching above 1800ppm.
4. On the 7th and 8th of June the supply fans consumed lower than normal levels of power between 7am - 10pm, resulting in a drop in the supply outlet mass flow rate, and an increase in temperature.The supply fan then consumed higher than average levels of power of 10pm.
5. There is a high supply fan outlet mass flow rate on 11 and 12 June for floors. Coincentally the HVAC system fan also consumed high amounts of fan power on both days. This pattern continues until the early morning of 13 June.
6. From June 2 onwards. the CEO's office had high temperatures of 32 to 40 degrees from 1pm till 4am the next morning.
7. Following the high temperature in the CEO office, on June 3 the CEO office had the highest concentration level of Hazium gas for the whole day.
8. The Hazium gas concentration spiked again at the CEO office on the 9th and 11th June, and these spikes were rather sudden.
Task 4
There is cause of suspicion that the high levels of Hazium gases does not occur naturally. and it seems that the Hazium spikes are targeted at the CEO, which raises alarm and that it could potentially be one of the employees wanting to cause harm to the CEO.
Knowing the time where the CEO's office had large spikes in the Hazium concentration level gives us an indication of where or who to look at, based on the prox sensors data. Knowing that the CEO office experienced the spike on the 3rd of June, we can deduce that anyone wanting to plant or release the gas would be gone before 7am (Height of spike), and the person should be present just before the Hazium levels start to increase. (i.e from 4pm onwards on 11 June)
Secondly, the attacker would not want to be present when the gas is released to avoid harming himself. Hence we are looking for an employee who:
1. Is present at level 3 before the increase in Hazium levels (I.e 2nd June, 4pm onwards)
2. Away throughout the period from the spike (i.e 7am on 3rd June) in Hazium
Suspect Reduction
Using the two criteria as mentioned above, I decided to reduce the pool of employees possible by using excel and filtering out employees who were present at Floor 3 on 9th June as well as on the 3rd of June based on the spikes shown. Employees who were present are assumed not to be the suspect as they would not want to be poisoning themselves, reducing the number of suspects to 97 in total out of a initial 125.
It is with this in mind that more investigation would have to be carried out to determine if the spike in Hazium gas is indeed man made and cause by perhaps a disgruntled employee of GasTech.
References
https://tableauandbehold.com/2015/04/13/creating-custom-polygons-on-a-background-image
http://www.tableau.com/learn/tutorials/on-demand/polygon-maps-8.2
http://dgdataservices.blogspot.sg/2014/08/how-to-create-interactive-home-button.html
